Radon Mitigation
How to handle radon mitigation
All homes and buildings can be mitigated and made safe from radon. Reducing radon is easy and inexpensive. If you have lived in your home for years and have recently found out that your radon levels exceed 4 pCi/L or more, don’t pack up and leave. Have your home mitigated by a professional. Did you find a home you love would love to buy but the radon test came back high? Don’t worry, it’s common to for may home sales to negotiate radon mitigation solutions after the inspection take place.
Extensive research has been conducted by various institutions and private industries in Colorado and have provided evidence-based practices for mitigating radon in homes and buildings. Although the techniques are reliable and a straightforward, all mitigation should be performed by a certified NRPP or NRSB contractor.
Do the mitigate right the first time
Proper radon mitigation requires more than sealing openings in the foundation, doors and wall cracks. Caulking openings has NOT been a proven method for reducing radon levels. Using a certified contractor will ensure installation of the system is according to Radon Mitigation Standards and local building codes.
Radon mitigation systems
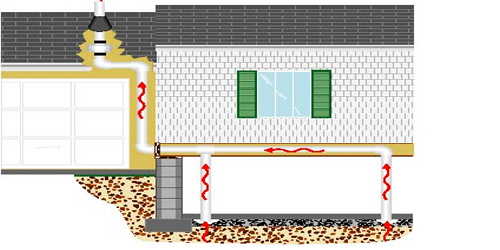
The standard radon system is designed and installed based on the construction of a home, not on the existing radon levels. Mitigation takes place when a system pulls radon-laden soil gas from underneath the foundation or crawlspace and exhausts it outside of the home or building. To achieve the suction, a small, continuously running fan is attached to the duct work in order to pull the radon and discharge it outdoors. A radon mitigation system usually consists of plastic pipe connected to an air pocket surrounded by the soil. This pipe can be connected to a hole drilled in the slab of the foundation, fitted through a sump lid connection. At the end of the pipe, usually outside, a fan is powered on to provide suction and move the radon gas outside of the home or building.
Key Elements to a radon system
Certified Radon Mitigation follows the following steps to ensure a proper radon system installation.
- The discharge of the radon system needs to:
- Be at least 10 feet above grade;
- Be at least 10 feet away or 2 feet above any opening to the interior of the home; AND
- Terminate above the eave of the roof.
- Fans for the radon system should not be located in the home or building. They can be allowed in an attic, on the outside of the home or building or in the garage.
- A manometer gauge should be located in a prominent location inside the home or building that indicates to the property owners that the radon system is on and functioning properly.
- Local electrical codes and and required permits need to be met in order to constantly power the radon systems fan.
- The radon mitigation system parts should be clearly labeled and a copy of the owners manual provided to the property owner.
- The home or building must be re-tested within 24 hours of the new mitigation system installation. This will ensure the radon levels do not exceed 4 pCi/L or more. After the install and re-test, periodic testing should be conducted every 2 years.
Radon Mitigation System Cost
When obtaining quotes for a radon mitigation system it’s always good to be involved with each inspection and consultation. Cost will depend on the effort of the system installation because each mitigation is a custom build.